
|
|
University of Hawaii WebMailUser's GuideOverviewLogon and Log Out Basic Navigation Basic Tasks Send a Message Read a Message Reply Reply All Forward Delete Using Folders Create Rename and Delete Put One Folder Inside Another Folder Move a Message Attachments Send an Attachment Receive an Attachment Address Book Create an Entry Use the Address Create a Group Address Entry Use the Group Address Other Tasks Check Disk Space Use the Vacation Feature Mail Forwarding Feature Collect External Mail For More Help Overview Information Technology Services is pleased to announce a Web-based email client to access and manage your electronic mail: a product called WebMail . (This replaces an earlier Web-based mailer as of February 18, 2002.) WebMail uses Sun's iplanet Messenger Express product. Prior to the release of WebMail, the University community used Pine (which runs on the UH UNIX systems) or email clients for the PC or Macintosh (such as Eudora, Outlook Express, or Netscape Messenger) for their email needs. WebMail is a robust email application with many advanced features including: address books, multiple folders, the ability to send and receive attachments, etc. Since WebMail is a Web-enabled email client, you will need a reliable Internet connection and a Web browser (Microsoft Internet Explorer v.4 or later, or Netscape Navigator v.4 or later) which has JavaScript enabled. There are several advantages to using WebMail: - access to your email from your office and home computers or on the road - intuitive, easy-to-use interface - ITS will backup your online WebMail folders - search folders for messages that meet certain criteria This document is a general introduction to WebMail and will cover commonly used features. For detailed information, refer to the WebMail Online Help facility. It provides the most complete information on the features of WebMail in a clear, easy-to-understand format. Logon and Logout 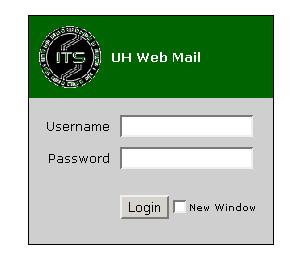
To access WebMail, point your Web browser to mail.hawaii.edu . You will be prompted to enter your ITS username and password. (To apply for an ITS username, visit this site: www.hawaii.edu/help/accounts/idreqinfo.html .) If these are entered successfully, you should now see the initial WebMail screen. To end your email session, click on the Logout button on the upper right corner of the screen. Basic Navigation  Navigation within WebMail is very intuitive, even for those
new to Web applications. There is a general tool bar
at the top of the screen. There are also icons for
common tasks. Different screens will have different icons
depending on what activities are available.
Navigation within WebMail is very intuitive, even for those
new to Web applications. There is a general tool bar
at the top of the screen. There are also icons for
common tasks. Different screens will have different icons
depending on what activities are available. Basic Tasks When you first login, a summary of the messages in your inbox is displayed. Your inbox is a folder (a collection of email messages) where new mail is initially stored. If you see no messages, then your inbox is empty. Here are some of the basic tasks which can be performed: 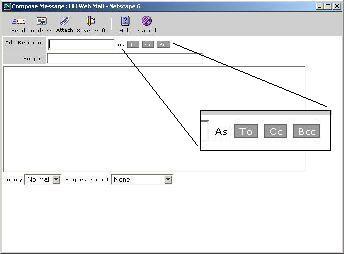 Send a new message - Click on the Compose button
on the tool bar. A new window appears for you to compose your
message. Type in the email address of the recipient in the
text box labeled Add Recipient , then click
on the To, CC , or BCC field. You may enter
multiple recipients.
Send a new message - Click on the Compose button
on the tool bar. A new window appears for you to compose your
message. Type in the email address of the recipient in the
text box labeled Add Recipient , then click
on the To, CC , or BCC field. You may enter
multiple recipients. (Note: CC stands for Carbon Copy - it means "send a copy to this person also." BCC stands for Blind Carbon Copy - "Don't let other people see that I am sending a copy to this person.") Type in a subject and the text of your message. When finished, click on the Send icon to send your message. Once your message is sent, the window with the message will close automatically. Read a message - To read a message in your inbox, click on the message's subject line, on the right side of the inbox. The email message will be displayed. Each message has a header containing information on who the email is from, the date and time it was sent, a list of recipients, and the subject. There are several things you can do after reading an email message: 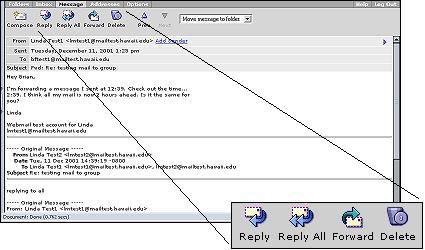 Reply - reply to a message by clicking on the
Reply icon. A new window appears for
you to compose your reply. The To field
is automatically filled in with the email address of the person
who sent the original message. You may add more recipients by clicking
on the To, CC, or BCC fields.
Reply - reply to a message by clicking on the
Reply icon. A new window appears for
you to compose your reply. The To field
is automatically filled in with the email address of the person
who sent the original message. You may add more recipients by clicking
on the To, CC, or BCC fields.The Subject field is also filled in as “Re: original subject”. Type in the text of your message. The original message is included as an attachment to your reply, not as quoted text. To send the reply, click on the Send icon. Once your message is sent, the window closes automatically. Reply All - if you receive a message that was sent to several people (a message which had multiple recipients), you can choose to reply to only the sender (by using Reply ) or to all of the recipients (by using Reply All). The procedure for using Reply All closely follows the procedure for using Reply. Forward - send one of your messages to another user by clicking on the Forward icon. A new window appears for the message you are forwarding. Enter the email addresses of the recipient. The subject line is filled in as “Fwd: original subject”. The original message is included as an attachment. Add the text of your message, then click on the Send icon to send the message. Delete - you can delete the message by clicking on the Delete button in the tool bar. This moves the message to a folder called Trash. Refer to the Folders section below on how to permanently delete messages. Using Folders A folder is simply a collection of email messages. To see a list of your folders, click on the Folders button of the tool bar. Everyone has four special folders by default: - Inbox holds the messages people send to you. - Drafts contains messages you started composing, but postponed to be sent later. - Sent holds a copy of each message you have sent out. - Trash is for messages you intend to delete. A Special Note on the Trash Folder: if you click the Empty Trash button, you will permanently delete the messages in the Trash folder. Anytime before then, you can move these messages to another folder. There are special actions you can perform on folders using the tool bar.  Create Folders - To create your own folder, click
on the New icon. You will be prompted
for a name for the new folder. After you click OK, the
new folder appears on the folder list.
Create Folders - To create your own folder, click
on the New icon. You will be prompted
for a name for the new folder. After you click OK, the
new folder appears on the folder list. Rename and Delete Folders - You can rename or delete a folder, by clicking on the radio button next to the folder's name and then clicking on the Rename or Delete icon. Note: once you delete a folder it is gone, along with any messages that were in the folder. It is NOT moved to the Trash folder. Put one folder inside another folder - You can move a folder to within another folder. Click on the radio button in front of the folder you wish to move, then click on the pull down menu next to the box that says "Move selected folder to: ". Highlight the folder you want to move this folder to, then release the mouse button. You will see the sub-folder indented under the main folder in your folder list. To view the messages in a specific folder, click the folder's name. Move a Message - You can move a message from one folder to another by viewing the message, clicking on the drop-down window that says " Move Message to Folder: ", and selecting the folder to which you would like the message moved. To move multiple messages from one folder to another:
Attachments It is possible to send files to another person by attaching them to email messages. These files are referred to as attachments . Any kind of computer file can be an attachment : a word processing file, a spreadsheet, a database, an audio or video file, etc. Although the recipient may be able to receive the attachment, the file is not usable if the recipient does not also have the appropriate program to read the file. For example, if you send an MS Word file to a person who uses Word Perfect, the recipient may not be able to use the file. Likewise, there are sometimes problems involved in sending files between PCs and Macs.In addition, although ITS imposes a maximum email size limit of 7 MB, it probably is not a good idea to send files larger than 2 MB. Large files take up too much disk space and may cause the recipient to exceed his or her allocated email disk quota. Also, if the recipient is using a modem, larger attachments may take hours to download.  To
send an attachment: compose a message and click
the Attach File icon (paper clip)
on the Compose Message tool bar. Enter
the location of the file you want to attach. (You can use the
Browse button to locate the file.) After selecting the
file to attach, click the Attach button and send your message
as you normally would. It is good practice to mention that you
are sending an attachment specify its format. (For example:
"I am attaching a spreadsheet in MS-Excel 97 format.")
To
send an attachment: compose a message and click
the Attach File icon (paper clip)
on the Compose Message tool bar. Enter
the location of the file you want to attach. (You can use the
Browse button to locate the file.) After selecting the
file to attach, click the Attach button and send your message
as you normally would. It is good practice to mention that you
are sending an attachment specify its format. (For example:
"I am attaching a spreadsheet in MS-Excel 97 format.")To receive an attachment: Read the message as you normally would. The message header will show if there is an attachment to the email. If there is an attachment, click on the file name. If the attachment is a simple text file, it will be displayed. If not, you will be prompted to either open the file or save it to disk. It is recommended that you save it to disk, so you can delete the message and recover the space on your account. Address Book WebMail has a simple address-book feature. It allows you to create short nicknames for long email addresses and store them in an address book. This is convenient when you don’t care to type in long addresses such as fred_jones@unix21.philadelphia.pennsylvania.edu . The Webmail address book also allows you to create private mailing lists. To use the address book: click on Addresses in the tool bar. To create an entry in the address book: click on the New Entry icon. 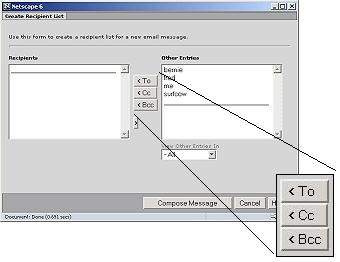 To
use the address: (the nickname for an email address),
click on Addresses in the tool bar, (the
Address book will be displayed). Click the Compose
icon, (a Create Recipient List In the
Other Entries list, select the nicknames you want included
in the recipient list and click <To
, <CC or <BCC as appropriate.
Then click Compose Message and compose your
message as you normally would.
To
use the address: (the nickname for an email address),
click on Addresses in the tool bar, (the
Address book will be displayed). Click the Compose
icon, (a Create Recipient List In the
Other Entries list, select the nicknames you want included
in the recipient list and click <To
, <CC or <BCC as appropriate.
Then click Compose Message and compose your
message as you normally would. To create a group address entry: (To make a mailing list, first you must create an address book entry for each individual who will be in the group.) Click on Addresses in the tool bar, (the Address book will be displayed). Click on the New Group icon. To use the group address: click on Addresses in the tool bar, (the Address book will be displayed). Click the Compose icon, (a Create Recipient List"View Other Entries In" drop-down box, select the name of the group you wish to use. The group's members are displayed. In the Other Entries list, select the nicknames you want included in the recipient list and click <To , <CC or <BCC as appropriate. Then click Compose Message and compose your message as you normally would. Other Tasks How to check the disk space available for your account: Click Options on the tool bar and then click Account Summary . Your disk usage information is displayed under Quota . How to use the Vacation feature: You might like to have a short message automatically sent to anyone who sends you mail while you are away on vacation. To do so, click Options on the tool bar, then click Vacation Message. You are prompted for a start and stop date for the vacation messages, also for a subject and some text to include. When you are done, click Save Changes. For more help, click Help, Composing Vacation Messages, How to forward a copy of all the messages you receive to another email address: Click Options on the tool bar, then click Settings , type an email address under Mail Forwarding and click Save Changes . For more information, click Help, Viewing and Managing Your Account, Settings, Mail Forwarding. What does the Collect External Mail link in the inbox do? You can use Webmail to read messages sent to a different POP mailbox, (say your LavaNet, RoadRunner or Hawaii OnLine account). You click Collect External Mail, enter the name of the remote POP server, your POP user ID and your POP password. There is a check box to delete mail from the remote server. If you choose, you can put mail from this account in its own special inbox. For more information, click Help, Managing Messages, Collecting External Mail. For More Help WebMail has a very good online help facility. Click on the Help button on the tool bar. A new window will appear with the help system. Click on the topic in which you have interest. For additional assistance, please phone the ITS Help Desk at: (808) 956-8883, send e-mail to help@hawaii.edu or send a fax to (808) 956-2108. The ITS Help Desk home page is: http://www.hawaii.edu/help The walk-in ITS Help Desk offices are located in Keller 105 and Keller 213 on the UH Manoa Campus. The University of Hawaii is an equal opportunity / affirmative action institution.
|