

Getting setup for Multi-Factor Authentication (MFA)
Step 1: Decide which method of authentication you wish to use
Step 2: Decide which two devices you want to use
Step 3: Setup your first device
Step 4: [optional] Add a second (or more) device
Step 5: Logging in
Step 6: Manage your devices
Step 1: Decide which method of authentication you wish to use
For more information about UH Login and Multi-Factor Authentication (MFA), go to https://www.hawaii.edu/its/uhlogin.
UH Login supports the following MFA methods:
- Duo Push, using the Duo Mobile app on a mobile device (smartphone or tablet)
- Duo Passcode, using the Duo Mobile app on a mobile device (smartphone or tablet)
- Phone Call, using either a mobile phone or landline
- SMS Passcode, using a mobile phone that supports SMS (text messaging)
- Yubikey Hard Token, which is inserted into your computer's USB port
Review the following table for more information on the requirements for each method, and whether or not the method can be used when completely offline (no internet or telephone service).
| Requires a Smartphone (Duo Mobile App) | Requires Internet Access (Mobile Data or WiFi) | Requires Telephony (Mobile Network or Landline) | Can be used offline | |
|---|---|---|---|---|
| Duo Push | YES | YES | NO | NO |
| Duo Passcode | YES | NO | NO | YES |
| Phone Call | NO | NO | YES | NO |
| SMS Passcode | NO | NO | YES | NO |
| Yubikey Hard Token | NO | NO | NO | YES |
Duo Push via the Duo Mobile App
If you have a supported mobile device, Duo Push is the recommended method. As long as your mobile device has mobile network or wi-fi service, authentication requests can be pushed to your device via the Duo Mobile app. You can download the Duo Mobile app to an iOS or Android device that meets the minimum requirements.
| iOS | Please see https://guide.duo.com/iphone for the supported version of iOS |
|---|---|
| Android | Please see https://guide.duo.com/android for the supported version of Android |
Once you have downloaded the Duo Mobile app and registered your mobile device, authentication requests will be "pushed" to your device through the Duo Mobile app. You would then open the Duo Mobile app and tap on "Approve" or "Deny" to approve or deny the authentication request.
Duo Passcode via the Duo Mobile App
The Duo Mobile app can be used to generate a passcode that can be used to login. Passcodes can be generated without requiring internet access, and can be used even if your mobile device is in airplane mode or otherwise not connected to a WiFi or mobile network with internet access. This is a great option to use when traveling or when in areas where access to the internet might not be guaranteed.
Phone Call
You can opt to authenticate via a phone call to a landline or mobile phone. When it's time to authenticate, you will receive a call on your registered phone number. You would then push "1" on your phone's keypad to authenticate, or push "9" to deny the authentication request.
Regarding phone numbers beginning with "+86"
Due to recent telephony restrictions by the Chinese government, Duo was previously unable to authenticate via phone call to users with +86 phone numbers. Users with a +86 phone number registered in Duo, would have seen the following notice:
.png)
As of May 10, 2019, Duo has resolved the issue and phone call authentication to +86 numbers are no longer being blocked. For more information, please refer to the following Duo knowledgebase article:
https://help.duo.com/s/article/5001
SMS Passcode
If you do not have a smartphone, but you have a mobile phone with SMS/text messaging capabilities, you can use an SMS passcode to authenticate. When requested, one (1) passcode will be sent to your phone as a text (SMS) message. Once an SMS passcode is received, the passcode can be saved and used even if your mobile device is no longer connected to a mobile network.
Yubikey Hard Token
A hard token (sometimes called an authentication or security token) is a hardware security device that is used to authorize a user. UH provides Yubikey hard tokens for purchase. The UH hard token is a usb device and must be inserted into your usb port to be used. You would then touch the hard token anytime you wanted to authenticate. If you do not have an available usb port, you cannot authenticate with the UH hard token. Hard tokens are not recommended and should be purchased only if you cannot use any of the other above means for authenticating.
For information on purchasing a UH hard token, please visit https://www.hawaii.edu/sitelic/tokens/
Step 2: Decide which two devices you want to use
ITS strongly recommends that you setup at least two devices for MFA. This is so that if one of your devices becomes unavailable (e.g smartphone forgotten or lost), you can still authenticate. Some samples of multiple devices could be:
- Smartphone and office landline
- Smartphone, office landline, and home landline
Once you have decided which two (or more) devices you will use for MFA, proceed to the next step (Step 3) of setting up your first device. If you have already setup one device, you may proceed to step 4 to add more devices.
Step 3: Setup your first device
- Setting up a Smartphone
- Setting up a Landline
- Setting up a non-Smartphone Cellular Phone
- Setting up a Tablet
For more information about UH Login and Multi-Factor Authentication (MFA), go to www.hawaii.edu/its/uhlogin.
Before going through this article, please review UH Login Multi-Factor Authentication (MFA) - Which authentication method should I use? to determine which authentication method suits your situation best. Once you have decided which method to use, use this document to register your first device. This document will explain how to register a mobile device, landline, or tablet as your first device to use for MFA.
We strongly recommend registering at least 2 devices. For example: a smartphone and an office landline. Please refer to UH Login Multi-Factor Authentication (MFA) - Managing Devices for information on managing registered devices, or UH Login Multi-Factor Authentication (MFA) - Adding Devices for information on registering additional devices.
Setting up a Smartphone
Although the screenshots and instructions that follow are for an iPhone, the steps are the same for iPhones and Android phones, except for identifying the type of smartphone.
- Login to the UH Login MFA Device Registration site at www.hawaii.edu/its/uhlogin/device-reg.
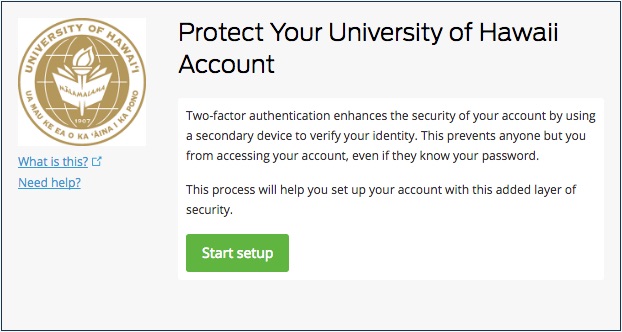
- You will see the following screen. Click on the Start setup button.
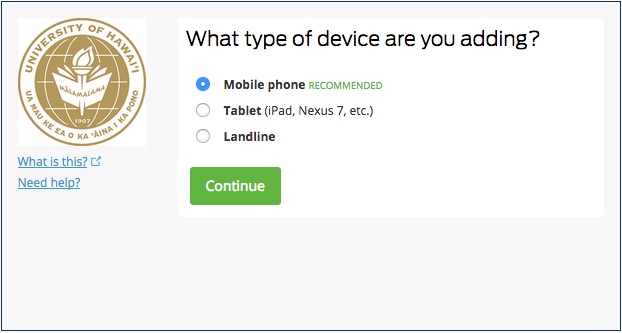
- Select Mobile phone, then click Continue.
- If necessary, select the country of your phone. Type your phone number, including area code (no parentheses or dashes are needed). Double check that the correct phone number is shown immediately beneath the box. If so, check the box next to the phone number. Click on Continue.
- Select the type of smartphone (in this case iPhone), then click Continue.
- If you have downloaded the Duo Mobile app to your phone, go to the next step. If you have not yet downloaded the Duo Mobile app to your phone, follow the directions within the box to download. You can also visit one of the following links from your smartphone (not your computer):
iOS: Duo Mobile for iOS
Android: Duo Mobile for Android
[Note: to download from the Google Play Store, you need to be logged in with a gmail.com account or enrolled in Consumer Apps.]
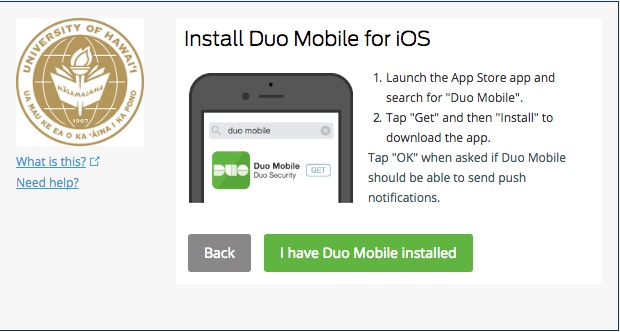
- Once you have downloaded the app to your phone, or if you already have the app downloaded to your phone, click on I have Duo Mobile installed.
-
You will see a barcode displayed.
Open the Duo Mobile app on your phone. If you are asked if you want to allow Duo Mobile to send Notifications, please allow notifications.
Press the + icon in the upper right corner, or press on the Add Account button. If you are asked if you want to allow Duo Mobile to access the Camera, please allow access.
Point your phone's camera (the camera's display should be shown on the phone's screen) at the barcode. Once the barcode is properly within the display, it will automatically be recognized. You can tell it was successful if you see a green checkmark within the barcode.
Once you see the green checkmark, click on Continue.
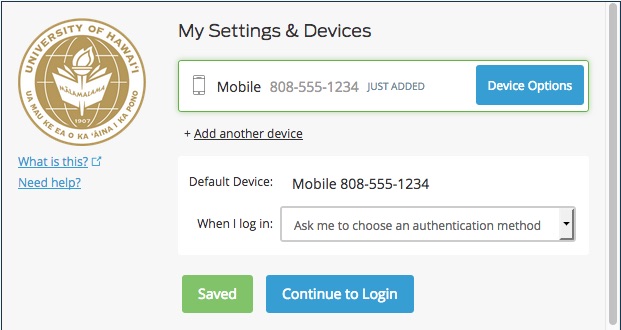
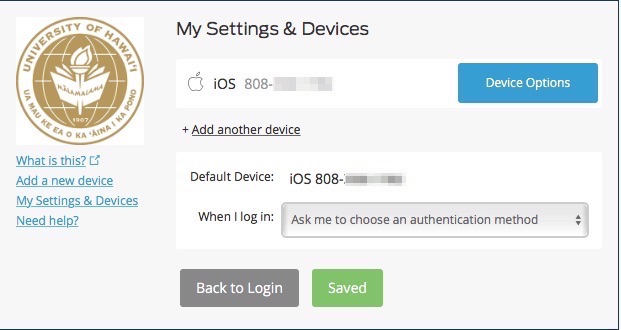
- At the next screen, you should see a green Saved button in the lower left. The When I log in option should be set to Ask me to choose an authentication method. Click on the Continue to Login button.

- If you were registering your device through the UH Login MFA Device Registration site, at the bottom of the next screen, you should see the message Enrollment successful!... This means that you have successfully registered your smartphone. You can now logout of the UH Login MFA Device Registration site.


For further information on the Duo Mobile app, please refer to Duo's guides:
iPhone: https://guide.duo.com/iphone
Android: https://guide.duo.com/android
Setting up a Landline
- Login to the UH Login MFA Device Registration site at www.hawaii.edu/its/uhlogin/device-reg.
- You will see the following screen. Click on the Start setup button.
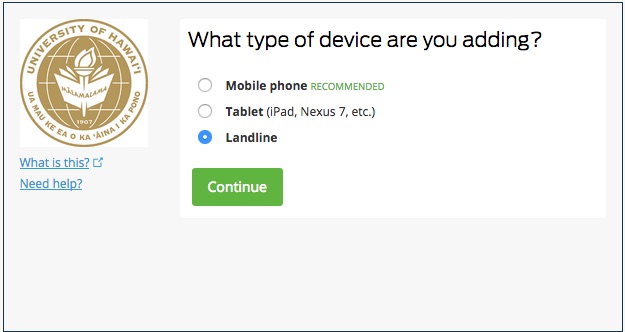
- Select Landline, then click Continue.
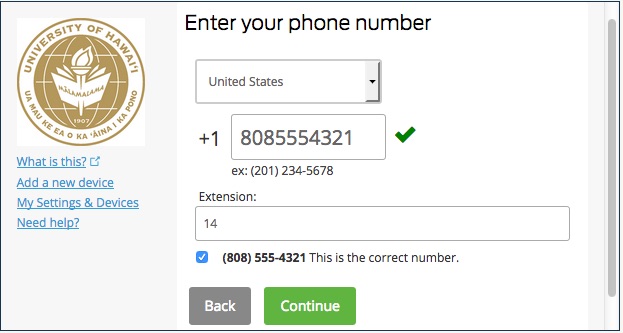
- If necessary, select the country of your phone. Type your phone number, including area code (no parentheses or dashes are needed). If you have an extension, type it in the Extension: box. Double check that the correct phone number is shown immediately beneath the box. If so, check the box next to the phone number. Scroll down, and click on Continue.
- At the next screen, you should see a green Saved button in the lower left. The When I log in option should be set to Ask me to choose an authentication method. Click on the Continue to Login button.

- If you were registering your device through the UH Login MFA Device Registration site, you should see the message Enrollment successful!... This means that you have successfully registered your landline. You can now logout of the UH Login MFA Device Registration site.

Setting up a non-Smartphone Cellular Phone
- Login to the UH Login MFA Device Registration site at www.hawaii.edu/its/uhlogin/device-reg.
- You will see the following screen. Click on the Start setup button.
- Select Mobile phone, then click Continue.
- If necessary, select the country of your phone. Type your phone number, including area code (no parentheses or dashes are needed). Double check that the correct phone number is shown immediately beneath the box. If so, check the box next to the phone number. Scroll down, and click on Continue.
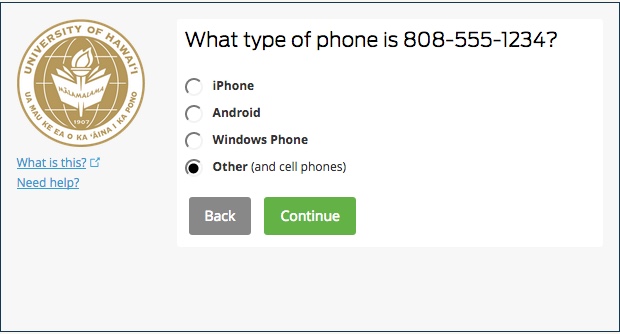
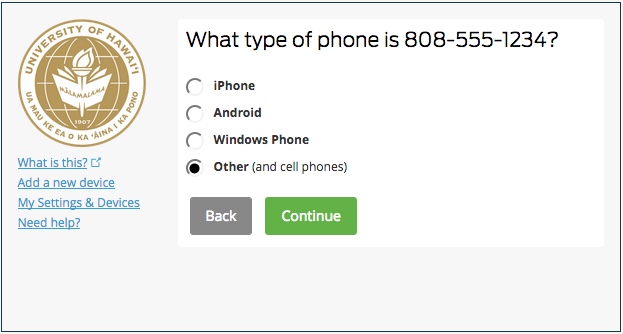
- Select Other as the type of phone, then click Continue.
- At the next screen, you should see a green Saved button in the lower left. The When I log in option should be set to Ask me to choose an authentication method. Click on the Continue to Login button.
- If you were registering your device through the UH Login MFA Device Registration site, you should see the message Enrollment successful!... This means that you have successfully registered your non-smartphone cellular phone. You can now logout of the UH Login MFA Device Registration site.
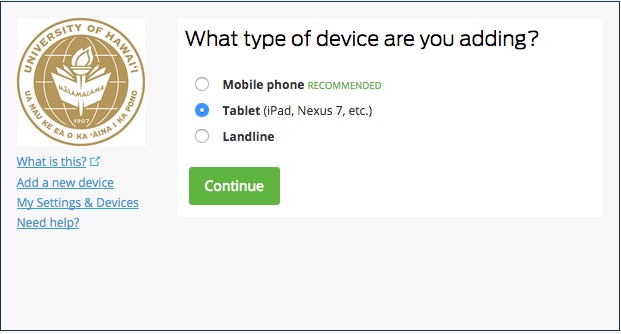
Setting up a Tablet
Although the screenshots and instructions that follow are for an iPad, the steps are the same for Android tablets.
- Login to the UH Login MFA Device Registration site at www.hawaii.edu/its/uhlogin/device-reg.
- You will see the following screen. Click on the Start setup button.
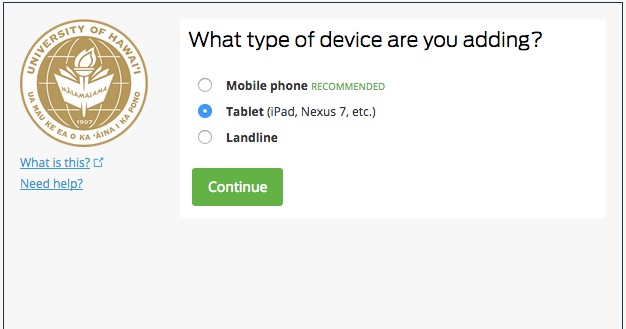
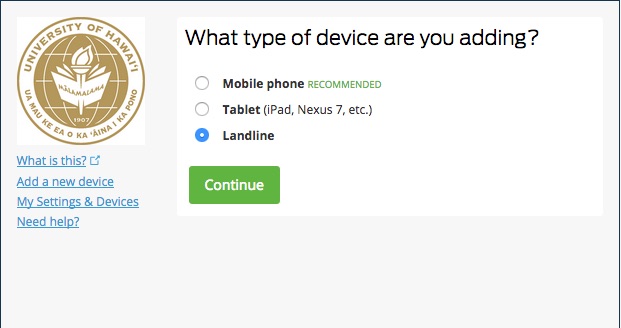
- Select Tablet, then click Continue.
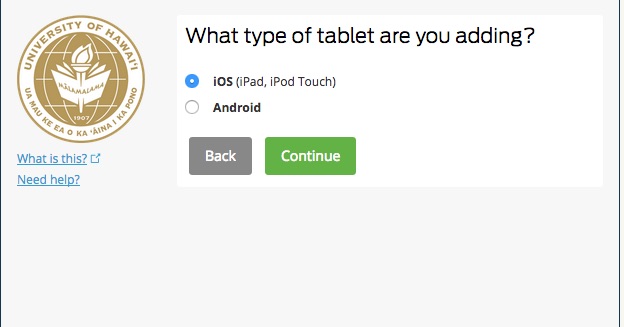
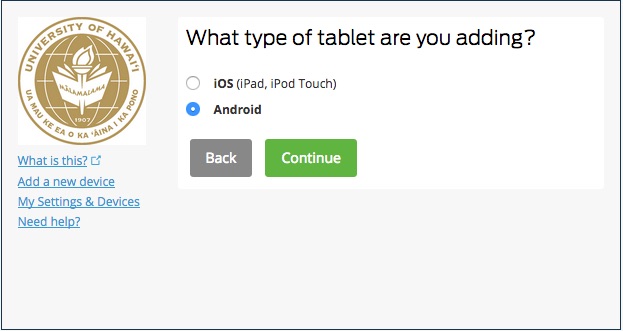
- Select the type of tablet. In this example, we will select iOS. Click Continue.
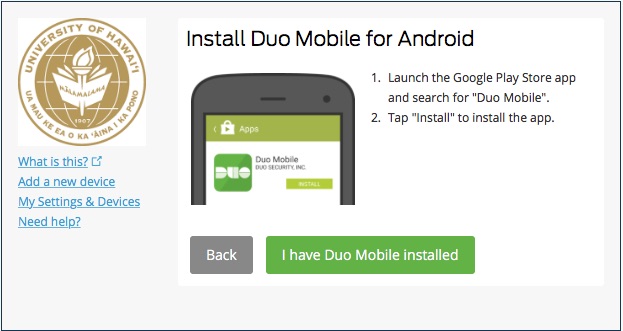
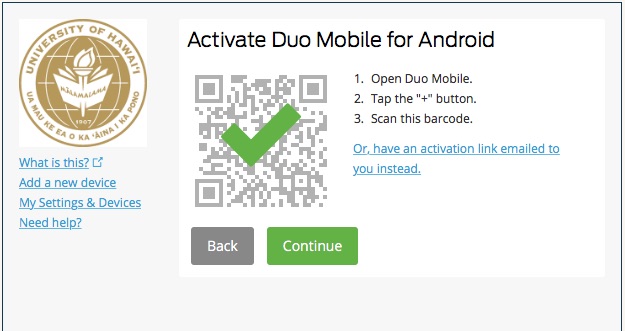
- If you have downloaded the Duo Mobile app to your tablet, go to the next step. If you have not yet downloaded the Duo Mobile app to your tablet, follow the directions within the box to download. You can also visit one of the following links from your tablet (not your computer):
iOS: Duo Mobile for iOS
Android: Duo Mobile for Android
[Note: to download from the Android Play Store, you need to be enrolled in Consumer Apps or logged in with a gmail.com account.]
-
You will see a barcode displayed.
Open the Duo Mobile app on your tablet. If you are asked if you want to allow Duo Mobile to send Notifications, please allow notifications.
Press the + icon in the upper right corner, or press on the Add Account button. If you are asked if you want to allow Duo Mobile to access the Camera, please allow access.
Point your tablet's camera (the camera's display should be shown on the phone's screen) at the barcode. Once the barcode is properly within the display, it will automatically be recognized. You can tell it was successful if you see a green checkmark within the barcode.
Once you see the green checkmark, click on Continue.
- At the next screen, you should see a green Saved button in the lower left. The When I log in option should be set to Ask me to choose an authentication method. Click on the Continue to Login button.
- If you were registering your device through the UH Login MFA Device Registration site, at the bottom of the next screen, you should see the message Enrollment successful!... This means that you have successfully registered your tablet. You can now logout of the UH Login MFA Device Registration site.
Step 4: [optional] Add a second (or more) device
This article will explain how to register devices for multi-factor authentication.
- Setting up a Smartphone
- Setting up a Landline
- Setting up a Tablet
- Setting up a non-Smartphone Cellular Phone
If you are not sure which authentication method to use, please review the article, UH Login Multi-Factor Authentication (MFA) - Which authentication method should I use?.
ITS recommends that you register at least 2 devices. For example: your office landline and your smartphone.
Setting up a Smartphone
Although the screenshots are for an iPhone, the steps are the same for iPhones and Android phones.
- Login to the UH Login MFA Device Registration site at www.hawaii.edu/its/uhlogin/device-reg.
- If you have not yet registered any devices, you will see the following screen. Click on the Start setup button, then proceed to Step 4.
- If you have already setup a device, at the next screen, click on Add a new device (located on the left side, under the gold seal).
You will then see the following screen. Click on the green button for the method you wish to use.
.jpg)
- Select the authentication method you wish to use. For this example, we will register a mobile phone. Select Mobile phone, then click Continue.
- If necessary, select the country of your phone. Type your phone number, including area code (no parentheses or dashes are needed). Double check that the correct phone number is shown immediately beneath the box. If so, check the box next to the phone number. Click on Continue.
- Select your device type, then click Continue.
- If you have downloaded the Duo Mobile app to your phone, go to the next step. If you have not yet downloaded the Duo Mobile app to your phone, follow the directions within the box to download. You can also visit one of the following links from your smartphone (not your computer):
iOS: Duo Mobile for iOS
Android: Duo Mobile for Android
[Note: to download from the Android Play Store, you need to be enrolled in Consumer Apps or logged in with a gmail.com account.]
-
You will see a barcode displayed.
Open the Duo Mobile app on your phone. If you are asked if you want to allow Duo Mobile to send Notifications, please allow notifications.
Press the + icon in the upper right corner, or press on the Add Account button. If you are asked if you want to allow Duo Mobile to access the Camera, please allow access.
Point your phone's camera (the camera's display should be shown on the phone's screen) at the barcode. Once the barcode is properly within the display, it will automatically be recognized. You can tell it was successful if you see a green checkmark within the barcode.
Once you see the green checkmark, click on Continue.
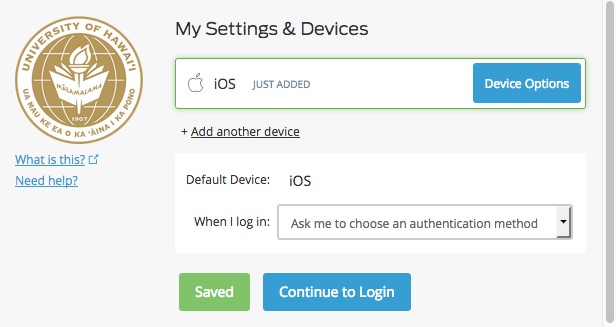
- You should be at the My Settings & Devices window. You should see a list of all your registered devices, with a Just Added next to the device you just added. This means that you have successfully registered the new device.
- You can now logout of the UH Login MFA Device Registration site.


Setting up a Landline
- Login to the UH Login MFA Device Registration site at www.hawaii.edu/its/uhlogin/device-reg.
- If you have not yet registered any devices, you will see the following screen. Click on the Start setup button, then proceed to Step 4.
- If you have already setup a device, at the next screen, click on Add a new device (located on the left side, under the gold seal).
You will then see the following screen. Click on the green button for the method you wish to use.
- Select the authentication method you wish to use. For this example, we will register a landline. Select Landline, then click Continue.
- If necessary, select the country of your phone. Type your phone number, including area code (no parentheses or dashes are needed). If you have an extension, type it in the Extension: box. Double check that the correct phone number is shown immediately beneath the box. If so, check the box next to the phone number. Scroll down, and click on Continue.
- You should be at the My Settings & Devices window. You should see a list of all your registered devices, with a Just Added next to the device you just added. This means that you have successfully registered the new device.
- You can now logout of the UH Login MFA Device Registration site.
Setting up a Tablet
Although the screenshots are for an Android tablet, the steps are the same for iOS tablets (iPad and iPod Touch) and Android tablets.
- Login to the UH Login MFA Device Registration site at www.hawaii.edu/its/uhlogin/device-reg.
- If you have not yet registered any devices, you will see the following screen. Click on the Start setup button, then proceed to Step 4.
- If you have already setup a device, at the next screen, click on Add a new device (located on the left side, under the gold seal).
You will then see the following screen. Click on the green button for the method you wish to use.
- Select the authentication method you wish to use. For this example, we will register a tablet. Select Tablet, then click Continue.
- Select the appropriate type of device. For this example, we will select Android. Click Continue.
- If you have downloaded the Duo Mobile app to your tablet, go to the next step. If you have not yet downloaded the Duo Mobile app to your tablet, follow the directions within the box to download. You can also visit one of the following links from your tablet (not your computer):
iOS: Duo Mobile for iOS
Android: Duo Mobile for Android
[Note: to download from the Android Play Store, you need to be enrolled in Consumer Apps or logged in with a gmail.com account.]
-
You will see a barcode displayed.
Open the Duo Mobile app on your tablet. If you are asked if you want to allow Duo Mobile to send Notifications, please allow notifications.
Press the + icon in the upper right corner, or press on the Add Account button. If you are asked if you want to allow Duo Mobile to access the Camera, please allow access.
Point your tablet's camera (the camera's display should be shown on the phone's screen) at the barcode. Once the barcode is properly within the display, it will automatically be recognized. You can tell it was successful if you see a green checkmark within the barcode.
Once you see the green checkmark, click on Continue.
- You should be at the My Settings & Devices window. You should see a list of all your registered devices, with a Just Added next to the device you just added. This means that you have successfully registered the new device.
- You can now logout of the UH Login MFA Device Registration site.
Setting up a non-smartphone Cellular Phone
- Login to the UH Login MFA Device Registration site at www.hawaii.edu/its/uhlogin/device-reg.
- If you have not yet registered any devices, you will see the following screen. Click on the Start setup button, then proceed to Step 4.
- If you have already setup a device, at the next screen, click on Add a new device (located on the left side, under the gold seal).
You will then see the following screen. Click on the green button for the method you wish to use.
- Select the authentication method you wish to use. For this example, we will register a mobile phone. Select Mobile phone then click Continue.
- If necessary, select the country of your phone. Type your phone number, including area code (no parentheses or dashes are needed). Double check that the correct phone number is shown immediately beneath the box. If so, check the box next to the phone number. Click on Continue.
- Select Other as your device type, then click Continue.
- You should be at the My Settings & Devices window. You should see a list of all your registered devices, with a Just Added next to the device you just added. This means that you have successfully registered the new device.
- You can now logout of the UH Login MFA Device Registration site.
Step 5: Logging in
This article explains how to login through the UH Login page using the different MFA methods. Please note that ITS strongly recommends that you setup at least two devices for MFA.
*As of December 30, 2023, the traditional Duo prompt has been replaced with the Duo Universal Prompt (UP).
New Default Device Behavior
The Duo Universal Prompt (UP) does not allow you to set a default device like the traditional Duo prompt allowed. The first time you login after the December 30 update, Duo will automatically send a Duo request to what they deem the most secure authentication method you have configured for your account. Listed below are the most to least secure methods of authentication as published by Duo:
- Duo Mobile push approval
- YubiKey passcodes
- Duo Mobile generated passcodes
- Non-Yubikey Hardware token passcodes
- SMS passcodes
- Phone call approval
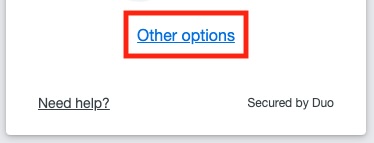
For example, if you have a Duo Push device setup, the Duo UP will automatically send a push to that device. You may click on the Other options link to see your other options:
If you pick a different authentication method, Duo will remember what you last used and will use that method by default the next time you are presented with the Duo UP.
New "Remember me" behavior
With the Duo UP, there is no longer a "Remember me for 7 days" checkbox. Instead, the first time you login under the Duo UP, you will see the following screen after authenticating:

- If you click on the "Yes, this is my device" choice, you will not be prompted again to authenticate with Duo for 7 days (equivalent to checking the "Remember me for 7 days" checkbox)
- On your next login after the 7 days has passed, you will be presented with the Duo UP, but will not be presented with the "Yes, this is my device/No, other people use this device" choice. Instead, from this time on, there will be a "Remember me" checkbox that should be checked (equivalent to checking the “Remember me for 7 days” checkbox).
- Should you clear your browser’s cookies/cache, you will be presented with the “Yes, this is my device/No, other people use this device” choice again.
- On your next login after the 7 days has passed, you will be presented with the Duo UP, but will not be presented with the "Yes, this is my device/No, other people use this device" choice. Instead, from this time on, there will be a "Remember me" checkbox that should be checked (equivalent to checking the “Remember me for 7 days” checkbox).
- If you click on "No, other people use this device", you will not be asked this question again for 7 days (unless the browser's cookies/cache are cleared), and will be presented with Duo each time you login (equivalent to NOT checking the "Remember me for 7 days” checkbox).
- If you clicked on the "No, other people use this device" choice accidentally, but you had actually wanted to remember their device, the only way to get Duo to prompt "Yes, this is my device" again is to either a) wait 7 days, or b) clear browser's cookies/cache. For instructions to clear your browser’s cookies/cache, please visit https://hawaii.edu/askus/1801.
There is more information on the new "Remember me" behavior at: https://guide.duo.com/universal-prompt#remembered-devices.
Available MFA methods
The following are the different MFA methods that are available:
- Duo Push (smartphone, tablet)
- Phone call (mobile phone)
- SMS text codes (mobile phone)
- Duo App-generated codes (smartphone, tablet)
- Landline
- UH Hard Token
Duo Push (smartphone, tablet)
If you have a Duo Push device setup, the Duo UP will default to automatically sending you a push. You will be presented with the following screen after entering your UH username and password:

A notification will appear on your Duo Push device:
- iOS: Press and hold on the notification, then tap on Approve to approve or Deny if it is a fraudulent request. You may have to unlock your device.
- Android: Tap on Notifications. You may have to unlock your phone. Tap on Approve to approve or Deny if it is a fraudulent request.
Optionally, and if it appears, click on the Yes this is my device option if you are using your own computer. This will prevent the Duo UP from prompting again for 7 days. See the New “Remember Me” behavior section for more information.
Unless clicking “Other options” and selecting a different authentication method, Duo UP will automatically push future authentication requests to your Duo Push device. See the New Default Device behavior section for more information.
For further information on the Duo Mobile app, please refer to Duo's guides:
iPhone: https://guide.duo.com/iphone
Android: https://guide.duo.com/android
Phone call (mobile phone)
Note: if you have a Duo Push device setup, you will first have to click on Other options before you can use the phone call method.
If you have a mobile phone device that does not have Duo Push setup, you will see the following screen. Click on the Call phone button.

A phone call will be placed to your mobile phone. Answer the call, then press 1 on the mobile phone's keypad to approve or press 9 to report a fraudulent request.
Optionally, and if it appears, click on the Yes this is my device option if you are using your own computer. This will prevent the Duo UP from prompting again for 7 days.
SMS text codes (mobile phone)
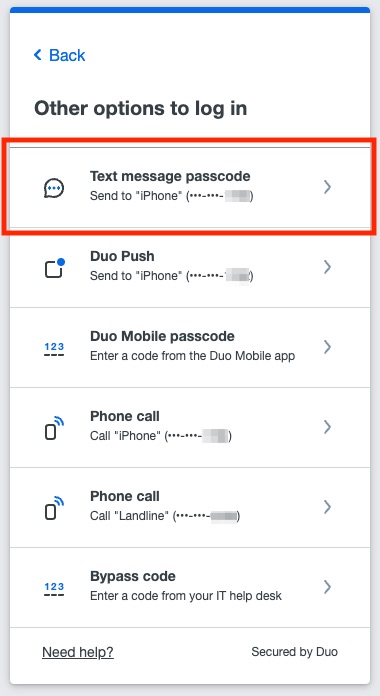
To select SMS text codes the first time you login under the UP, you will need to click on Other options:
Then, click on Text message passcode.
A passcode will be automatically sent to your phone. Enter this passcode and click on Verify.

Optionally, and if it appears, click on the Yes this is my device option if you are using your own computer. This will prevent the Duo UP from prompting again for 7 days.
If it is not the first time you are using SMS passcodes, the following screen will appear instead. Click on Send a passcode.

A passcode will be automatically sent to your phone. Enter this passcode and click on Verify.
Duo App-generated codes (smartphone, tablet)
The Duo App will generate codes that will allow you to login, even if your smartphone or tablet does not have wifi or cellular data service.
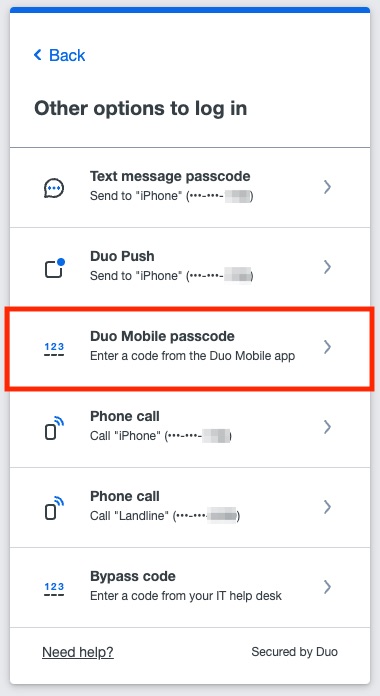
At the Duo Push screen, click on Other options.
Click on Duo Mobile passcode.
Open the Duo Mobile app on your phone or tablet. If needed, expand the "University of Hawaii" section so that the (6 digit) code is displayed:

Enter the displayed code into the Passcode box, and click Verify.

Optionally, and if it appears, click on the Yes this is my device option if you are using your own computer. This will prevent the Duo UP from prompting again for 7 days.
Landline
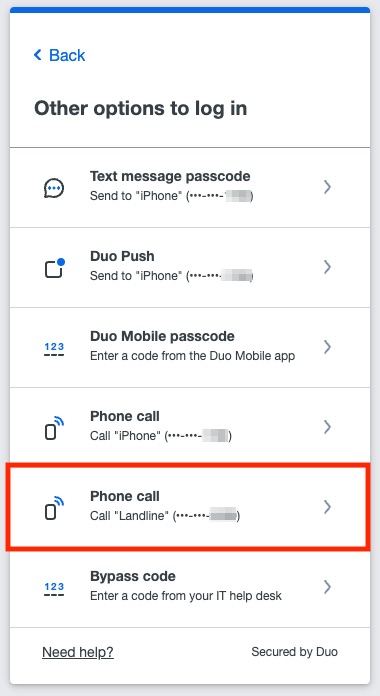
If you had last logged in with a different method, you may have to click on Other options.
Then select Phone call (Call "Landline" option):
If you have a landline setup on your Duo account, or if Landline was your last used authentication method, you will see the below screen. Click on Call phone.

A phone call will be placed to your designated landline phone. Answer the call, then press 1 on the Landline's keypad to approve or press 9 to report a fraudulent request.
Optionally, and if it appears, click on the Yes this is my device option if you are using your own computer. This will prevent the Duo UP from prompting again for 7 days.
UH Hard Token
The UH hard token is a usb device that you would insert into your computer's usb port. You would then "touch" a specific area of the hard token to authenticate. UH hard tokens can be purchased through the ITS Site License office. Please visit www.hawaii.edu/sitelic/tokens. Both USB A and USB C hard tokens are available.
To authenticate using a hard token, follow these steps:
- Insert the hard token into your computer's USB port prior to any login attempts. Note for macOS users: the first time you insert a hard token into a Mac, you may be told, "Your keyboard is unrecognizable" or "Your keyboard cannot be identified". This message can be ignored; close the window by clicking on the red dot in the upper left.
- If it is the first time you are trying to authenticate using a hard token, you will need to click on Other options when you get to the Duo MFA window.
- At the next screen, click on Yubikey passcode.
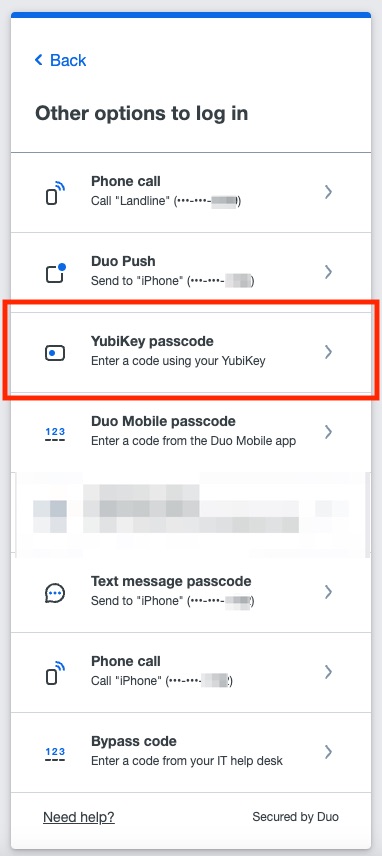
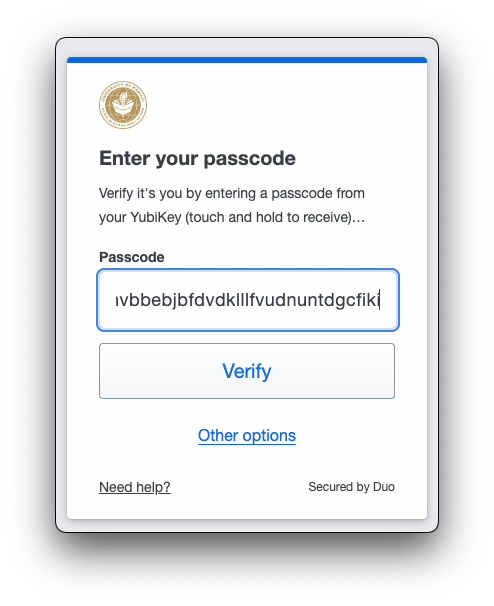
- You will see the following screen.

- Click within the Passcode box so that there is a cursor blinking in the box. Press down on the token's gold area with any finger (see below for where to press).
- A (long) code will automatically be entered into the box, and the "Verify" button will automatically be pressed, and you should now be logged in.
- Optionally, and if it appears, click on the Yes this is my device option if you are using your own computer. This will prevent the Duo UP from prompting again for 7 days.
| USB A hard token | USB C hard token |
 |
 |
Step 6: Manage your devices
- My Settings & Devices screen
- Changing the default device
- Changing a device name
- Deleting a device
- Reactivating the Duo Mobile app (does not apply to landlines)
My Settings & Devices screen
To manage your Duo devices, you need to go to the My Settings & Devices screen.
- Login to the UH Login MFA Device Registration site at www.hawaii.edu/its/uhlogin/device-reg.
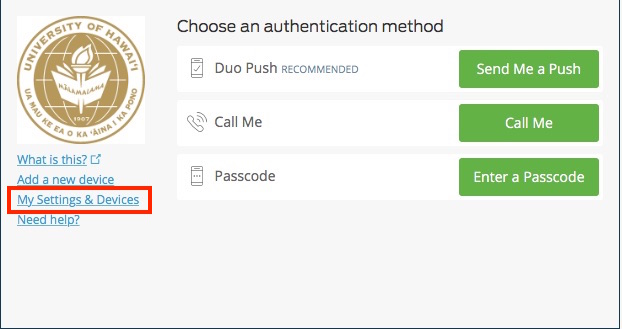
- You will see the following screen. Click on My Settings & Devices (located on the left side, under the gold seal).
- You will then be asked to authenticate with your second factor again. Click on the appropriate button to proceed.
- You will now be at the My Settings & Devices screen. You will see a list of your registered devices. This screenshot shows a sample of one registered device:
This screenshot shows a sample of multiple registered devices:

Changing the default device
You can only change the default device if you have more than one device setup.
- Go to the the My Settings & Devices screen as described in the My Settings & Devices screen section.
- If necessary, scroll down. Under Default Device, click on the down arrow, then select the device you wish to be the default. Note: the When I login option should remain Ask me to choose an authentication method.
- If necessary, scroll down. Click on the Save button. When the change has been saved, the Save button will change to a Saved button.
- If you are done with managing your devices, you can logout of the UH Login MFA Device Registration site.
.jpg)
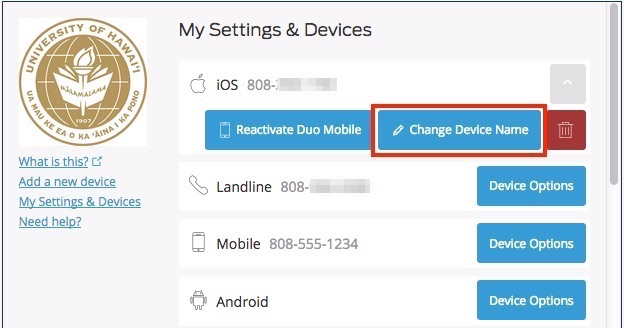
Changing a device name
- Go to the the My Settings & Devices screen as described in the My Settings & Devices screen section.
- Click on the Device Options button that's on the same line as the device whose name you wish to change.
- The screen will now look like the one below. Click on the Change Device Name button.
- In the box that appears, type a new name for your device. Click on the Save button. To cancel the change, click on the X button.
- You will see a message that you have successfully modified the device name. If you are done with managing your devices, you can logout of the UH Login MFA Device Registration site.
.jpg)
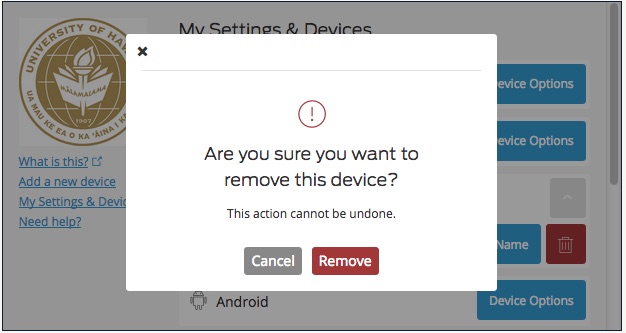
Deleting a device
- Go to the the My Settings & Devices screen as described in the My Settings & Devices screen section.
- Click on the Device Options button that's on the same line as the device you wish to delete.
- The screen will now look like the one below. Click on the Trash Can icon.
- You will be asked if you're sure you want to remove the device. If you are sure, click on the Remove button; otherwise, click on Cancel.
- You will see a message that you have successfully removed the device. If you are done with managing your devices, you can logout of the UH Login MFA Device Registration site.

Reactivating the Duo Mobile app (does not apply to landlines)
If you have a new phone but have the same phone number, you need to "reactivate" the Duo Mobile app on your new phone. (If you have a new phone AND a new phone number, activate the new phone as a new device.)
- Go to the the My Settings & Devices screen as described in the My Settings & Devices screen section. For Step 3, click on the Call Me button. Your phone will ring. Answer the call and press "1" on the keypad to approve the login and proceed.
- Click on the Device Options button that's on the same line as the device you wish to reactivate.
- The screen will now look like the one below. Click on the Reactivate Duo Mobile button.
- Select the appropriate phone type for the new phone, then click Continue.

- Below is the next screen you will see if you picked iPhone in step 5 (if you picked Android the remaining steps are similar). If you have not yet downloaded the Duo Mobile app to your new phone, follow the directions within the box to download and install the app. Once you have downloaded the app to your new phone, or if you already have the app downloaded to your new phone, click on I have Duo Mobile installed.
-
You will see a barcode displayed.
Open the Duo Mobile app on your phone. If you are asked if you want to allow Duo Mobile to send Notifications, please allow notifications.
Press the + icon in the upper right corner, or press on the Add Account button. If you are asked if you want to allow Duo Mobile to access the Camera, please allow access.
Point your phone's camera (the camera's display should be shown on the phone's screen) at the barcode. Once the barcode is properly within the display, it will automatically be recognized. You can tell it was successful if you see a green checkmark within the barcode.
Once you see the green checkmark, click on Continue.
- You have now activated the Duo Mobile app on your new phone. If you are done with managing your devices, you can logout of the UH Login MFA Device Registration site.
.jpg)


ref: http://www.hawaii.edu/infotech/uhusernamepractices.html
