
![]()
![]()
![]()
![]()
![]()
![]()
![]()
![]()
![]()
![]()
![]()
![]()
![]()
![]()
![]()
![]()
![]()
Adding a PowerPoint Presentation - for Macintosh (either scroll down through page or select from one of the following choices)
About PowerPoint
Saving as a Web Page
Uploading Using Goliath
Adding the Presentation
Download the Text Based Version
About Powerpoint - for Macintosh
Often instructors will want to add a PowerPoint presentation to a Content Module created using the "Content Module" WebCT tool. Although this is possible, less technical difficulties are experienced if one adds a "Presentations" section or area (go to Adding a new course section (organizer page)) to the homepage and then add each presentation as a single page link.
The most compatible PowerPoint version for working with WebCT was 97/98 with the newest versions (2001 - 2004) needing setting adjustments or processing through a utility to become compatible.
For any file to be viewable on the Web it needs to be in an Internet compatible format such as HTML. Thus, for students to view the presentation online, no matter what computer platform they use, the PowerPoint will need to be saved as a Web Page (2000, 2001, XP, 2003, 2004) or HTML (97/98).
If you want students to click on a presentation, download to their machines and open using an installed version of Microsoft PowerPoint then uploading and linking to the original PowerPoint (.ppt) file as a "Single Page" can be done (go to Adding a single page).
When uploading and linking directly to a PowerPoint file that has NOT been converted to a webpage, add a link to a PowerPoint Viewer. These viewers allow students to run a PowerPoint presentation in "Show" mode without having PowerPoint installed. Students would simply drag and drop the downloaded PowerPoint file onto of the installed viewer (or open directly via the viewer).
To find a download site for viewers go to "http://www.google.com" and type in a search for either "PowerPoint Viewer for Windows" OR "PowerPoint Viewer for Macintosh". You can also choose to add the URL(s) for these sites directly to your course by "Adding a page or tool" to the course and selecting the "URL" tool (go to Adding a URL).
Saving as a WebPage
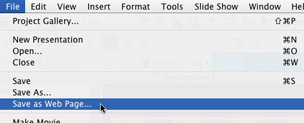
In PowerPoint (these shots are from Office 2001, but the process applies to versions 2001+ as well) select from the menu "File" and "Save as Web Page".
Locate an area on your computer (Desktop) and select to "Save".
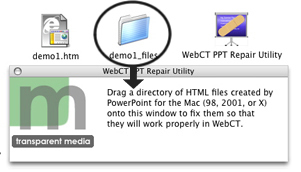
The saving process results in producing a single .html file and a folder containing several files.

After downloading and installing the WebCT PPT Repair Utility (click here to Download), open the folder and double click on the icon for "WebCT PPT Repair Utility".

Drag and drop only the folder that was created during the "Save as webpage" process onto the "WebCT PPT Repair Utility" window and wait for it to Ding.
The presentation file and folder can now be uploaded to the course.
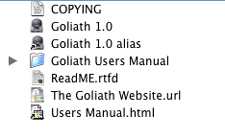
Goliath allows for multiple files and folders to be uploaded to a WebCT course by dragging and dropping. Goliath is free and can be downloaded from "http://www.webdav.org/goliath/#download", choose either Classic MacOS or Mac OS X.
Once fully downloaded and installed, open the Goliath folder and double click on the Goliath 1.0 icon.
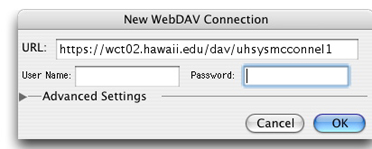
Enter the location address. This address begins with "https" then uses the server name (Instructional - wct01 or Development - wct02) and Course ID.
To locate your course ID, log into WebCT, enter the course homepage, look at the URL or Address and it is right between the words "/SCRIPT/" and "/scripts/".
- Instructional courses the course ID usually contains the campus, CRN, the year and a semester code (ex: MAN3A35652200510).
- Development courses the course ID usually contains the campus, UH username and a number (ex: manoamcconnel4).
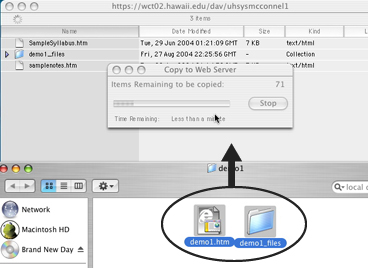
Once the URL is entered, type in your UH username and password, click OK. In the following screen shot, I am uploading to a course on the Development server.
A window to the course "My-Files" area will open. To upload the presentation, drag and drop both single .html file and folder into the window.
Add the Presentation
If you plan on having many presentations add a "Presentation" section first by adding an "Organizer Page", then add each presentation as a single page.
Log into the WebCT course and on the Homepage, if you created a "Presentation" section, click to enter the section first then proceed with this tutorial.
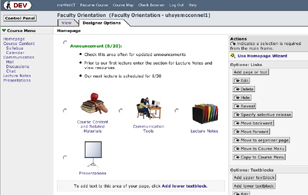
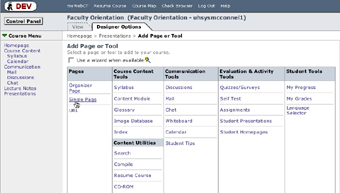
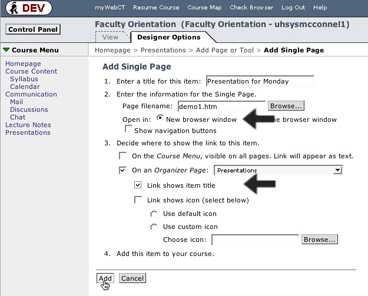
Once entered, select the link for "Add page or tool" and choose "Single Page".
Type in the name of the Presentation (Sample), and select the "Browse" button.
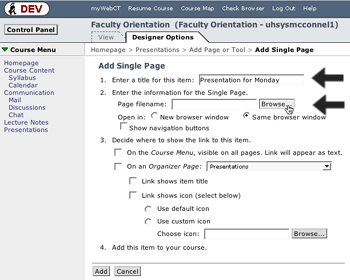
Select the radio button next to the .html file name of the presentation and select "Add selected".
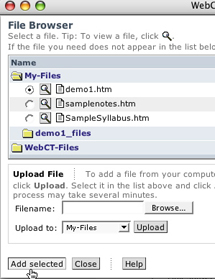
Select the radio button for "New browser window" and since a course may have many presentations (don't want to find a unique icon for each) just select the checkbox for "Link shows item title", and click the "Add button".
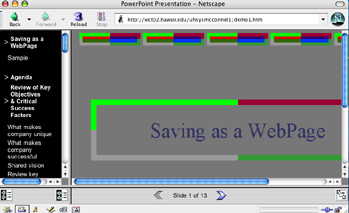
Students would click on the presentation link and a pop up window would have the presentation.
Return to Main Tutorial Menu